Showing posts with label Printing on Fabric. Show all posts

Friday, August 5, 2011

Sun Prints

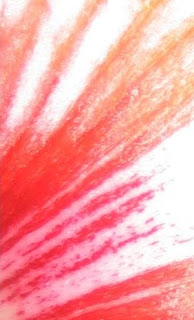
On Tuesday a friend and I got together and made sunprints using Setacolor paint.

The shapes put on top of the fabrics in two of these are the wooden ones from the craft store. They are cheap and work well-heavy enough not to blow away, if there is wind.

 She has metal plates that we put under the fat quarters of cotton, then sprayed water on the fabric and painted them. After exposing them to the sun, we had the prints.


I really love getting comments and try to reach people, but my server doesn't want to give me the email from someone's profile. Email me, and I'll answer. It's fun to exchange ideas.

I also have to remember to give more information on things.  The fabrics from the last post were fat quarters, and I wanted to use only fabrics from the bundle, so the piece is about 30 inches square. Most of what I do is small, as that is what I enjoy making and why I get more done. My family all have lots of bed quilts and don't seem to use them anyway, so I rarely make them anymore and mostly for charity when I do. Also, what I do tends to be labor intensive and can be fairly heavy with embellishments, so hanging is an issue if they are large.

Monday, July 25, 2011

Sun Printing

We actually had sun yesterday in the Pacific NW. I managed to do two sun prints before helping with the deer fence. Today it is raining again.
Living in the woods gives me access to lots of ferns, so I used two types on this piece and Setacolor Transparent paint. It has to be the transparent type to sun print.

The resists on this one are the leaves from a weed. I used one pin in each to hold them in place. There wasn't any wind so that worked. I like the shadows that create different values when the pieces are not totally anchored down.

Thanks to everyone who comments. It's fun to hear from people.

Monday, August 31, 2009

Printing on Fabric

Carol asked me about printing on fabric, so I thought this would be the place to answer. Many years ago Threads had a reader say in a letter that she did it-before color printers in the home. I tried it and was lucky. Now I know some of the things you need to be careful about.

Several companies produce fabrics that are ready for the printer and are available at some fabric, quilt, and craft stores. They come pretreated to make them accept and keep the ink from the inkjet printer. They are also backed by a paper that is peeled off later. You can buy several kinds of cotton and silk and even sheers. If you do a lot of printing on fabric, you can treat your own fabric with Bubble Jet Set or Inkaid to save on costs. I just use the pretreated fabrics for convience. If you treat your own, iron them on freezer paper for going through the printer. Be sure they are cut to the correct size and have no threads loose to catch or wrap around printer parts.

Check to make sure you load the printer in the correct way, so it prints on the fabric not the paper. I've made all the mistakes, but hey that's how you learn. Just load one sheet at a time and stay with the printer while it works. I use the regular ink setting, but some like to use the best setting. Each company has it's own directions for treating the fabric after it's printed and the ink is dry, either by heat setting with the iron or rinsing. Read the directions. I do both in case. The paper is removed before rinsing, but be careful not to distort the fabric. Sorry but I don't have a lazer printer, so I don't know how to print using it.
Here's the next set of manipulations of the amarylis. I crop a section near the center. Then arrange 4 of them, rotating and flipping the sections to get two designs.I'm not sure which is my favorite. Any opinions?

Now you've gotten what my kids used to call the full lecture. "Can't you just give a simple answer Mom?" Evidentally not.